GKE Autopilot Walkthrough

TLDR
Here I work through Google’s interactive GKE1 Autopilot Walkthrough tutorial. I create an Autopilot cluster, configure access both within the Google Cloud console & on my local dev machine, deploy the Online Boutique microservice application to the cluster, scale the cluster to explore Autopilot’s autoscaling features, and finally delete the cluster.
Intro
Learning a new technology can sometimes be daunting … especially when it involves cloud, network engineering, & the Internet. There are loads of Kubernetes resources/tutorials on the internet, & it’s been around for over a decade, so why another one? This is for documenting my experience. I’ve kind of always seen this tool as the thing for cloud engineers to handle to scale services in production.
That’s still true today. Recently, I’ve discovered that quite a few geospatial data science teams are using Kubernetes to scale their satellite imagery data pipelines. With my experience handling geospatial data, I hope to grow my skillset in cloud engineering with handling satellite imagery pipelines at scale.
Fundamentals first -> so lets go! 🌏 💾 🚢 📦
Resources
About GKE Modes of Operation
GKE allows you to select 2 modes of operation when creating a cluser:
- Autopilot
- Standard
Creating a Cluster in Autopilot Mode
Creating an Autopilot cluster benefits from Google Cloud handling the following:
- Nodes: Automated node provisioning, scaling, and maintenance
- Networking: VPC-native traffic routing for clusters
- Security: Shielded GKE Nodes and Workload Identity
- Telemetry: Cloud Operations logging and monitoring
Setup Cluster Basics
The following CLI command is comparible to what Google Cloud runs to create the Kubernetes cluster.
To select the region, I used Google’s Cloud Region Picker.
gcloud beta container \
    --project \
"gke-autopilot-cluster-479822" clusters create-auto "my-autopilot-cluster" \
    --region \
"us-east1" \
    --release-channel \
"regular" \
    --enable-ip-access \
    --no-enable-google-cloud-access \
    --network \
"projects/gke-autopilot-cluster-479822/global/networks/default" \
    --subnetwork \
"projects/gke-autopilot-cluster-479822/regions/us-east1/subnetworks/default" \
    --cluster-ipv4-cidr \
"/17" \
    --binauthz-evaluation-mode=DISABLED
Fleet Registration
This feature helps you to manage multiple clusters together.
A fleet lets you logically group and normalize Kubernetes clusters, helping you uplevel management from individual clusters to groups of clusters. To use multi-cluster capabilities and apply consistent policies across your systems, register your cluster to a fleet.
Networking
This section is for defining access to the Control Plane. You can select access through using DNS or through using IPv4 addresses.
You also define cluster networking, e.g. how applications in the cluster communicate with each other & how clients can reach them.
Advanced Settings
Here you can choose from 3 target Release Channels: Rapid, Regular, & Stable. The default is Regular (recommended).
- Rapid
- Use to test new releases before they’re qualified for production use or general availability.
- Regular
- Balance feature availability and release stability. Versions have been qualified over a longer period. Recommended for most users.
- Stable
- Use it to prioritize stability over new features. GKE rolls out changes and new versions on the Stable channel last, after validating them on the Rapid and Regular channels.
Learn more about choosing the best channel:
Once selected, default configuration can be changed & defined for the following areas:
- Automation, Service Mesh, Backup plan, Security, AI and Machine Learning, Operations, Metadata
Review & Create
Here your can review all settings, and then click Create Cluster. After about 5 minutes, your cluster should be up & running.
Configure Access to Cluster
Here we walk through configuring the Kubernetes command line tool to access our cluster. This will allow us to monitor/interact with our cluster on our local machine.
Resources:
Firstly, gcloud CLI must be installed. This allows us to work with the Google Cloud SDK from the command line / terminal.
gcloud Setup & Config
This is my first time using Google Cloud, so I need to configure it using:
After authenticating through the browser, next we will pick a project to use. Here I select the project that Google Cloud created when setting up the autpilot cluster: gke-autopilot-cluster-479822.
Next, we specify a default Google Compute Engine region-zone to use. I selected us-east1-b here since it’s best for my physical location.
After this, Google SDK should have created a ~/.config/gcloud/ directory with your configuration. The Google Cloud SDK configuration information is written to ~/.config/gcloud/configurations/config_default. This looks something like the following:
kubectl Config
We can use gcloud to generate a “kubeconfig” context that stores our GKE cluster information for kubectl.
This kubeconfig file is stored under $HOME/.kube/config on macOS.
The kubectl configuration can be output with kubectl config view.
To view current context of kubectl, we can run:
For more commonly used kubectl commands, see:
Working with an Application on the Autopilot Cluster
The next sections of the tutorial involve deploying a microservice demo application to your Autopilot Cluster.
The walkthrough on https://console.cloud.google.com has you use the Google Cloud Console built-in terminal & Cloud Shell (VS Code) editor.
However, Kubernetes was designed to be able to do this remotely, so we will use the kubectl CLI in our local dev environment. With API access/auth & config setup, these steps can be done in either your local dev setup or within the Google Cloud Console.
Additionally, VS Code’s Kuberenetes extension allows us to monitor our cluster. We’ll show what that looks like as well.
Deploying Application to Cluster
Here we clone the demo microservice application (an Online Boutique). Then, we deploy it to our autopilot cluster.
git clone --depth 1 https://github.com/GoogleCloudPlatform/microservices-demo.git
cd microservices-demo
kubectl apply -f ./release/kubernetes-manifests.yaml
The output for kubectl apply below:
kubectl apply -f ./release/kubernetes-manifests.yaml
kubectl apply -f ./release/kubernetes-manifests.yaml
deployment.apps/currencyservice created
service/currencyservice created
serviceaccount/currencyservice created
Warning: autopilot-default-resources-mutator:Autopilot updated Deployment default/loadgenerator: defaulted unspecified 'cpu' resource for containers [frontend-check] (see http://g.co/gke/autopilot-defaults).
deployment.apps/loadgenerator created
serviceaccount/loadgenerator created
deployment.apps/productcatalogservice created
service/productcatalogservice created
serviceaccount/productcatalogservice created
deployment.apps/checkoutservice created
service/checkoutservice created
serviceaccount/checkoutservice created
deployment.apps/shippingservice created
service/shippingservice created
serviceaccount/shippingservice created
deployment.apps/cartservice created
service/cartservice created
serviceaccount/cartservice created
deployment.apps/redis-cart created
service/redis-cart created
deployment.apps/emailservice created
service/emailservice created
serviceaccount/emailservice created
deployment.apps/paymentservice created
service/paymentservice created
serviceaccount/paymentservice created
deployment.apps/frontend created
service/frontend created
service/frontend-external created
serviceaccount/frontend created
deployment.apps/recommendationservice created
service/recommendationservice created
serviceaccount/recommendationservice created
deployment.apps/adservice created
service/adservice created
serviceaccount/adservice created
Monitoring Cluster
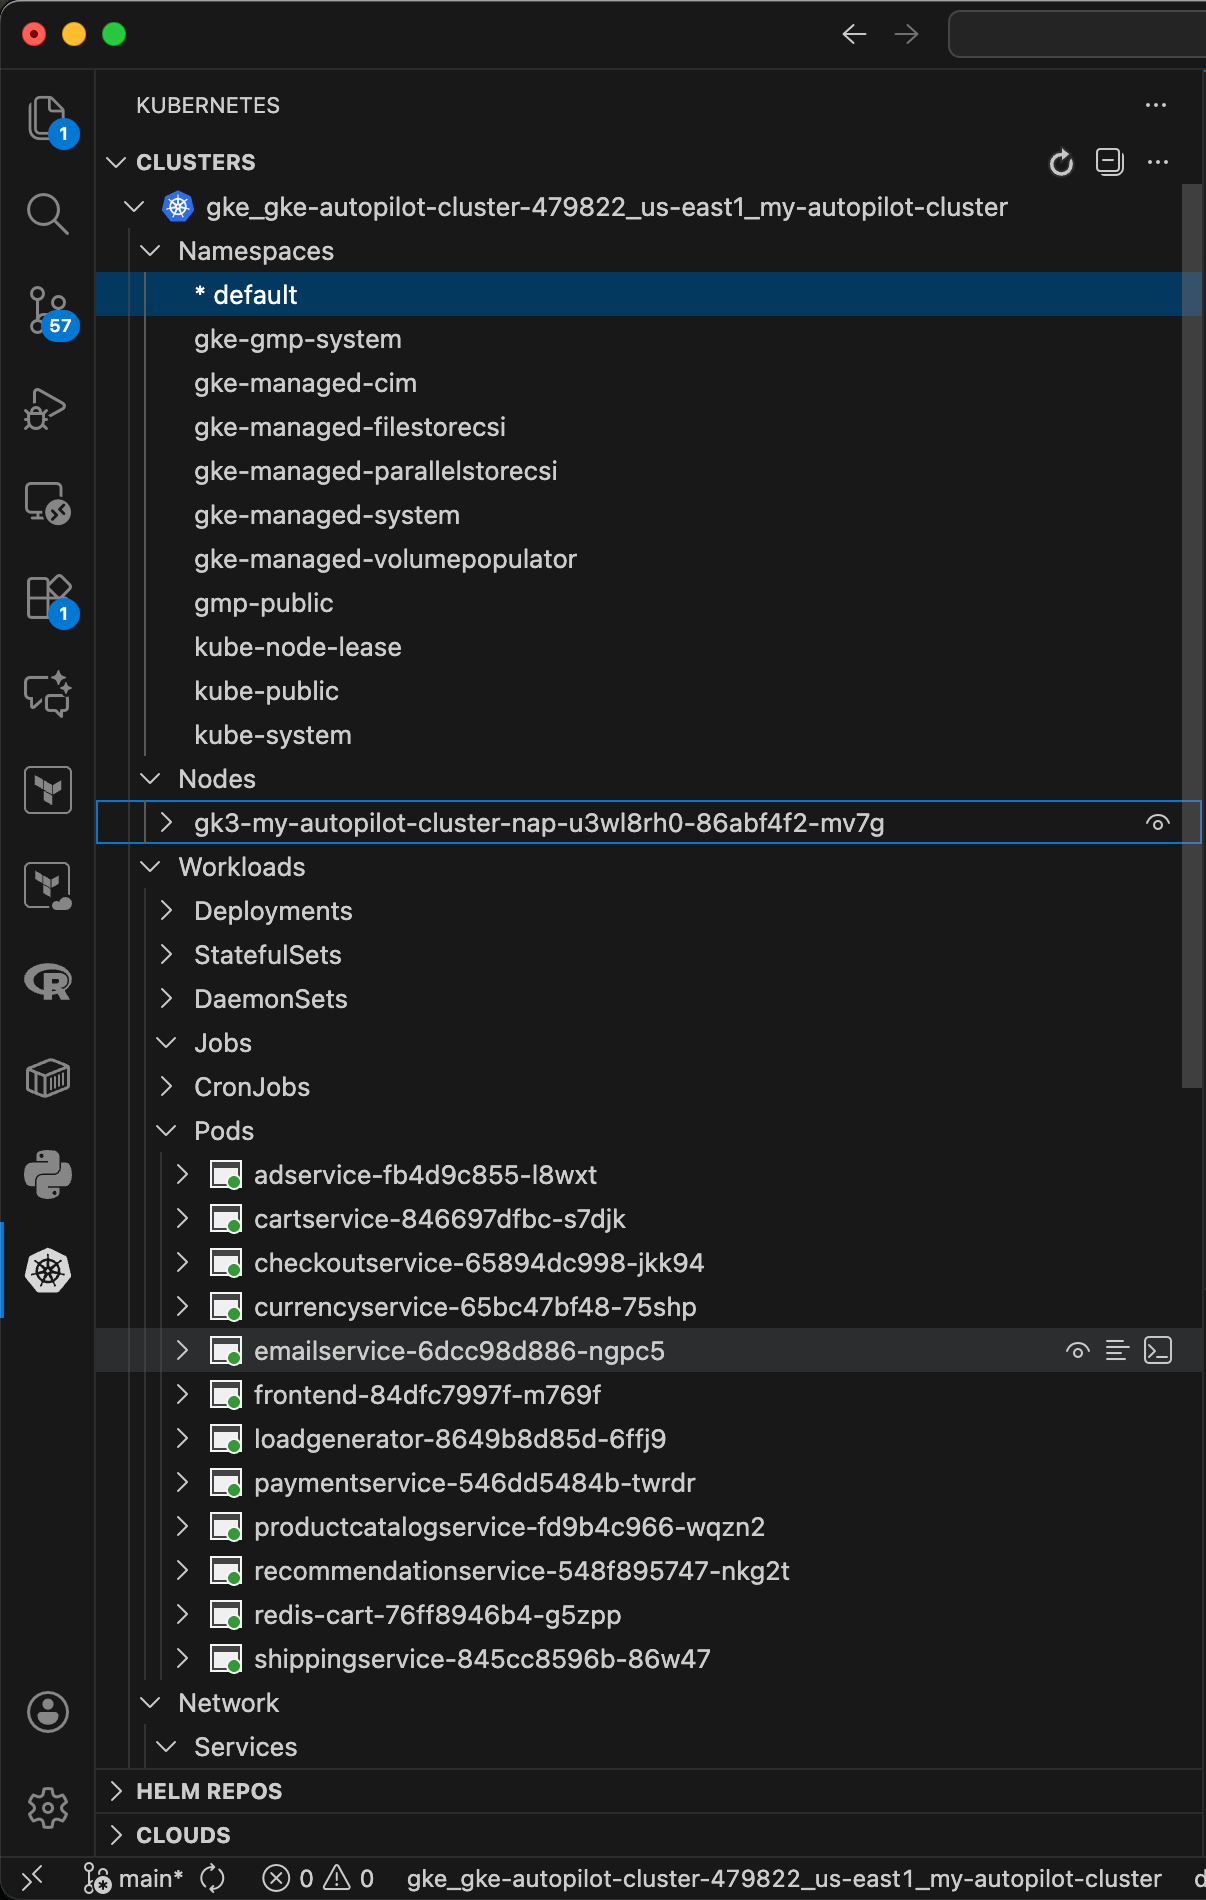
Next, we can monitor our cluster. The below command shows us the state of our pods:
kubectl get pods
NAME                                     READY   STATUS    RESTARTS   AGE
adservice-fb4d9c855-l8wxt                1/1     Running   0          118m
cartservice-846697dfbc-s7djk             1/1     Running   0          118m
checkoutservice-65894dc998-jkk94         1/1     Running   0          118m
currencyservice-65bc47bf48-75shp         1/1     Running   0          118m
emailservice-6dcc98d886-ngpc5            1/1     Running   0          118m
frontend-84dfc7997f-m769f                1/1     Running   0          118m
loadgenerator-8649b8d85d-qlpwv           1/1     Running   0          99m
paymentservice-546dd5484b-twrdr          1/1     Running   0          118m
productcatalogservice-fd9b4c966-wqzn2    1/1     Running   0          118m
recommendationservice-548f895747-nkg2t   1/1     Running   0          118m
redis-cart-76ff8946b4-g5zpp              1/1     Running   0          118m
shippingservice-845cc8596b-86w47         1/1     Running   0          118m
We can also checkout something similar in the Kubernetes VS Code extension.
Accessing Microservice Frontend
We can access the front-end website of the deployed Online Boutique app by entering the IP into the browser under “EXTERNAL-IP” below.
Additionally, we can access this IP in the Google Cloud console under:
Resource Management -> Workloads -> frontend -> Exposing services -> frontend-external -> Endpoints
Scaling Kubernetes Autopilot Cluster
Kubernetes was designed to scale container applications. Here we will explore doing so with the Autopilot cluster to demo some of its capabilities.
Useful resources:
Apply Changes to Deployment in Autopilot Cluster
Either through the kubectl CLI, Cloud Shell, or using VS Code, we can apply a change to our deployment.
Here we choose to change the frontend Deployment’s CPU resource requests from 100m to 650m (millicpus/millicores).
In this demonstration, we will see how the Autopilot cluster adjusts our resoures to properly fit the updated CPU requests value. When we suppply a Pod without or with values that stretch the constraints, Autopilot adjusts them to fit automatically.
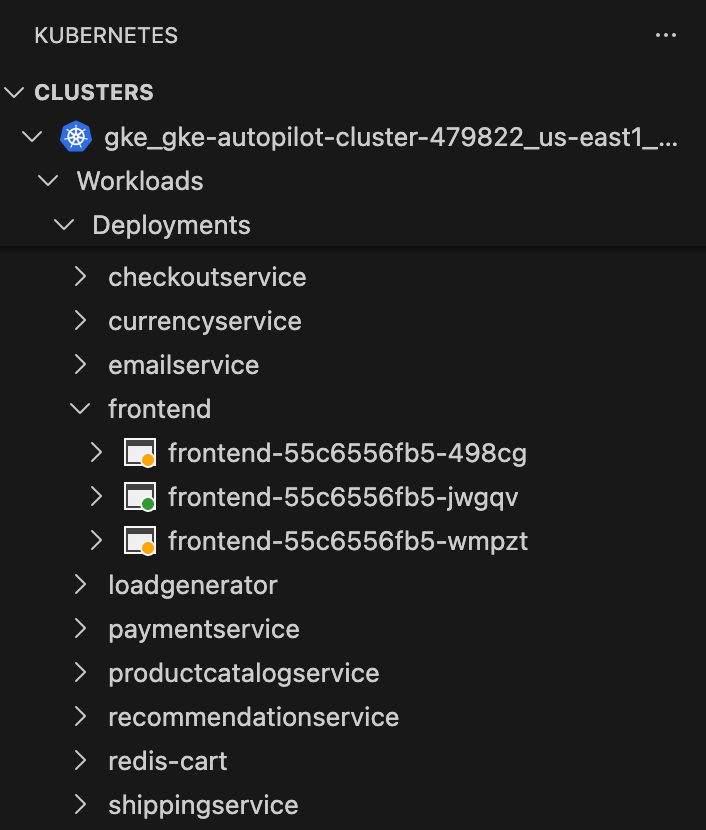
To grab our frontend Pod’s configuration, in the Kubernetes VS Code extension, we can open our cluster & go to:
Workloads -> Deployments -> frontend
We can also describe the frontend service’s running Pod by opening the Deployment & clicking on “Describe”.
Under “Pod Template” -> “Containers” -> “Limits”/“Requests”, we see that our CPU limits are set to 200m/100m respectively.
We will see how we can change 1 of these values & Autopilot will handle the rest. We will do this by increasing the CPU request value in spec.template.spec.containers.resources from 100m to 650m.
Navigate to this value in the deployment-frontend Pod’s yaml config that you just opened by clicking on the Workload in the kubernetes extensions. Change the spec.template.spec.containers.resources.requests.cpu value from 100m to 650m. Then, open command pallete with CMD+shift+P & use Kubernetes: Apply.
This opens a Kuberenetes diff, & then VS Code will ask you to apply the changes in a notification. Click “Apply” to deploy the changes.
This is the equivalent of running kubectl apply on the YAML frontend deployment that you are directly editing.
Next, we can describe the Pod again to see how Autopilot applied the changes. We see that our frontend container “Limits” CPU value got changed from 200m to also 650m to account for our Requests change. Additionally, Limits/Requests memory values were updated from 128Mi/103Mi to both 666Mi.
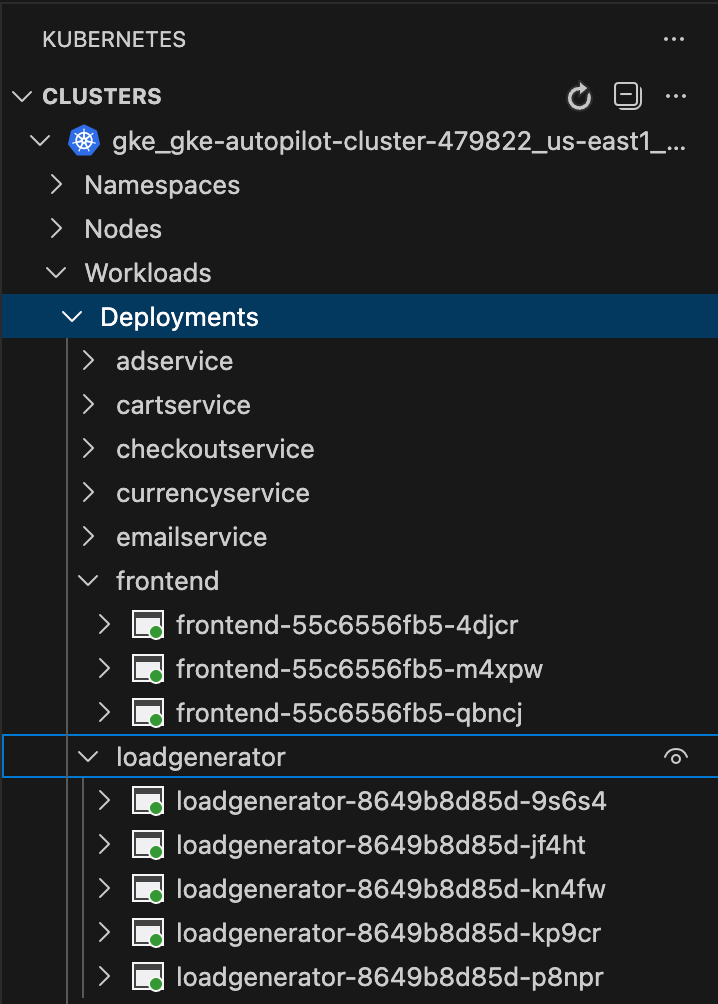
Scaling a Workload
Here we will scale our frontend deployment by 3. The new scale does not fit on the existing cluster. However, we expect Autopilot to sclae it for us by adding nodes accordingly.
The below specifies Kubernetes to scale our cluster to have 3 Replicas, or copies of pods, of the frontend deployment.
In our Clusters pane, we can see 2 new frontend deployment Pods being deployed.
When we re-describe our frontend Deployment, here is what we learn:
kubectl describe deployment/frontend
...
Conditions:
  Type           Status  Reason
  ----           ------  ------
  Progressing    True    NewReplicaSetAvailable
  Available      True    MinimumReplicasAvailable
OldReplicaSets:  frontend-84dfc7997f (0/0 replicas created), frontend-74fbc9c757 (0/0 replicas created)
NewReplicaSet:   frontend-55c6556fb5 (3/3 replicas created)
Events:
  Type    Reason             Age   From                   Message
  ----    ------             ----  ----                   -------
  Normal  ScalingReplicaSet  29m   deployment-controller  Scaled up replica set frontend-55c6556fb5 from 1 to 3
Now, we will tear down the extra pods & bring back our deployment to it’s original state:
And here can see that the Autopilot cluster handles this accordingly
kubectl describe deployment/frontend
...
Conditions:
  Type           Status  Reason
  ----           ------  ------
  Progressing    True    NewReplicaSetAvailable
  Available      True    MinimumReplicasAvailable
OldReplicaSets:  frontend-84dfc7997f (0/0 replicas created), frontend-74fbc9c757 (0/0 replicas created)
NewReplicaSet:   frontend-55c6556fb5 (1/1 replicas created)
Events:
  Type    Reason             Age   From                   Message
  ----    ------             ----  ----                   -------
  Normal  ScalingReplicaSet  67s   deployment-controller  Scaled down replica set frontend-55c6556fb5 from 3 to 1
Autoscaling the Application
Here we will enable a horizontal Pod autoscaling policy (HorizontalPodAutoscaler - HPA) of the frontend Deployment to add new Pods to the cluster when existing Pods are over 5% CPU utilization.
We can view information on the HPA “autoscaler” below. We can also get a more detailed description using kubectl describe hpa.
Now, we will trigger horizontal Pod autoscaling by scaling out the load generator service (adding 5 replicas).
We can easily discover this change in the Kubernetes VS Code extension. As well as get some quick info on the events that have triggered our HPA.
kubectl describe hpa
Name:                                                  frontend
Namespace:                                             default
Labels:                                                <none>
Annotations:                                           <none>
CreationTimestamp:                                     Mon, 08 Dec 2025 15:55:46 -0500
Reference:                                             Deployment/frontend
Metrics:                                               ( current / target )
  resource cpu on pods  (as a percentage of request):  4% (24m) / 5%
Min replicas:                                          1
Max replicas:                                          3
Deployment pods:                                       3 current / 3 desired
Conditions:
  Type            Status  Reason              Message
  ----            ------  ------              -------
  AbleToScale     True    ReadyForNewScale    recommended size matches current size
  ScalingActive   True    ValidMetricFound    the HPA was able to successfully calculate a replica count from cpu resource utilization (percentage of request)
  ScalingLimited  False   DesiredWithinRange  the desired count is within the acceptable range
Events:
  Type     Reason                   Age                From                       Message
  ----     ------                   ----               ----                       -------
  Warning  FailedGetResourceMetric  13m (x4 over 21m)  horizontal-pod-autoscaler  No recommendation
  Normal   SuccessfulRescale        7m6s               horizontal-pod-autoscaler  New size: 3; reason: cpu resource utilization (percentage of request) above target
  Normal   HpaProfilePerformance    7m6s               horizontal-pod-autoscaler  The HPA rescaled target based on performance profile
Teardown Cluster
We will delete (teardown) our cluster to free up our cloud resources & end all cloud utilization toward our billing account. This can be done with the gcloud CLI or within the Google Cloud console.
gcloud container clusters delete my-autopilot-cluster --region us-east1
gcloud container clusters delete my-autopilot-cluster --region us-east1
This ends up taking roughly 5 minutes to complete the teardown.
Fin
Now go off into the great unknown & do wonders with kubectl, K8s, GKE, & Autopilot Clusters in Google Cloud :)
Footnotes
Google Kubernetes Engine↩︎